
Ugh. The familiar scent of warm plastic, the fan roaring like a jet engine, and the dreaded slowdown – your laptop is trying to tell you something. And what it’s saying isn’t good. It’s overheating, and if you ignore it, you’re looking at serious problems. I’ve seen it a hundred times: a perfectly good laptop slowly turning into a brick, all because of heat. Don’t let it happen to you.
 This isn’t some generic “clean your vents” article. I’m going to walk you through exactly what causes overheating, how to diagnose the problem (pinpointing the actual culprit), and the practical steps you can take to cool things down, fix the underlying issues, and prevent it from happening again. I’ll also bust some myths that often make things worse. Let’s get started.
The Overheating Villain: Why Your Laptop Is Feeling the Heat
The core of the problem? Heat. Obviously. But why is your laptop generating so much of it? The answer usually boils down to a few key areas:
- Dust Buildup: This is the number one enemy. Over time, dust, pet hair (if you have them), and general grime accumulate inside your laptop’s cooling system. This blocks airflow, trapping heat inside. Think of it like a clogged artery – the heat can’t escape.
- CPU/GPU Strain: Your Central Processing Unit (CPU) and Graphics Processing Unit (GPU) are the powerhouses of your laptop. When you’re running demanding programs, playing games, or doing video editing, these components work overtime, generating significant heat.
- Faulty Cooling System: The fans and heat sinks are designed to pull heat away from the components and exhaust it. If the fan isn’t working correctly, or the heat sink is damaged or poorly designed, the system can’t do its job.
- Ambient Temperature: Using your laptop in a hot environment (like direct sunlight or a poorly ventilated room) will make the internal heat build-up more quickly.
- Outdated or Corrupted Drivers: Sometimes, poorly installed or outdated drivers can cause your CPU/GPU to work harder than necessary, leading to overheating.
- Overclocking: If you’ve tinkered with your laptop’s settings and overclocked the CPU/GPU, you’re pushing them beyond their designed limits, which generates extra heat.
The root cause is almost always one or a combination of these. But how do you figure out which one is the culprit in your case?
Diagnostic Time: Pinpointing the Heat Source
Before you start taking things apart, you need to figure out where the heat is coming from. Don’t just start blowing air into your vents hoping for the best – you need a methodical approach. Here’s how to diagnose the problem:
Step 1: The Touch Test (Basic but Effective)
Carefully feel the areas of your laptop. Usually, the hottest parts are around the vents (typically on the sides or back), the keyboard, and the bottom. Be cautious; some areas can get extremely hot. This gives you a general idea of where the heat is concentrated. If the bottom is incredibly hot, for example, it could indicate an issue with the heat sink or fan.
Step 2: Listen Up! (The Fan’s Clues)
What’s your fan doing? Is it constantly running at high speed? Is it making unusual noises, like grinding or rattling? A noisy fan is a classic sign of trouble. It could be clogged with dust, failing, or simply working overtime to compensate for another issue. A silent fan, paradoxically, can also be a problem – it might not be working at all!
Step 3: Software Sleuthing: Monitoring Temperatures
This is where you get the real data. You need to download a temperature monitoring tool. There are several free and reliable options, such as:
- HWMonitor: A popular and easy-to-use program that displays real-time temperatures for your CPU, GPU, and other components.
- Core Temp: This is designed specifically for monitoring CPU temperatures.
- Open Hardware Monitor: A versatile tool that provides detailed information about your hardware, including temperatures, fan speeds, and voltage readings.
Install one of these programs and run it while you use your laptop as you normally do. Pay attention to the temperatures. The CPU and GPU are the critical components. For most laptops, you want to see the following:
- Idle: Temperatures under 50°C (122°F) are ideal.
- Light Use (web browsing, document editing): Temperatures should stay below 70°C (158°F).
- Heavy Use (gaming, video editing): Temperatures can go up to 80-90°C (176-194°F), but prolonged use at these levels can lead to issues. If you consistently see temperatures over 90°C (194°F), you have a problem.
Step 4: Check Task Manager (Spotting Resource Hogs)
Open your Task Manager (Windows: Ctrl+Shift+Esc; macOS: Activity Monitor). Look at the “Processes” tab and sort by “CPU” or “Memory” usage. Are there any programs or processes that are consistently using a high percentage of your CPU or GPU? These could be the cause of the increased heat. Maybe there’s a rogue program running in the background, consuming resources. Close any unnecessary programs to see if the temperature drops.
Step 5: The “Clean Boot” Test (Eliminating Software Conflicts)
Sometimes, software conflicts can lead to high CPU usage and, consequently, overheating. Perform a “clean boot” to see if the problem disappears. This starts Windows with a minimal set of drivers and startup programs. (Google “how to clean boot windows” to find specific instructions for your operating system). If the overheating stops during a clean boot, it points to a software conflict.
Fixing the Heat: Step-by-Step Solutions
Once you have a good understanding of the cause, you can start fixing the problem. Here’s a breakdown of common fixes, from the simplest to more advanced:
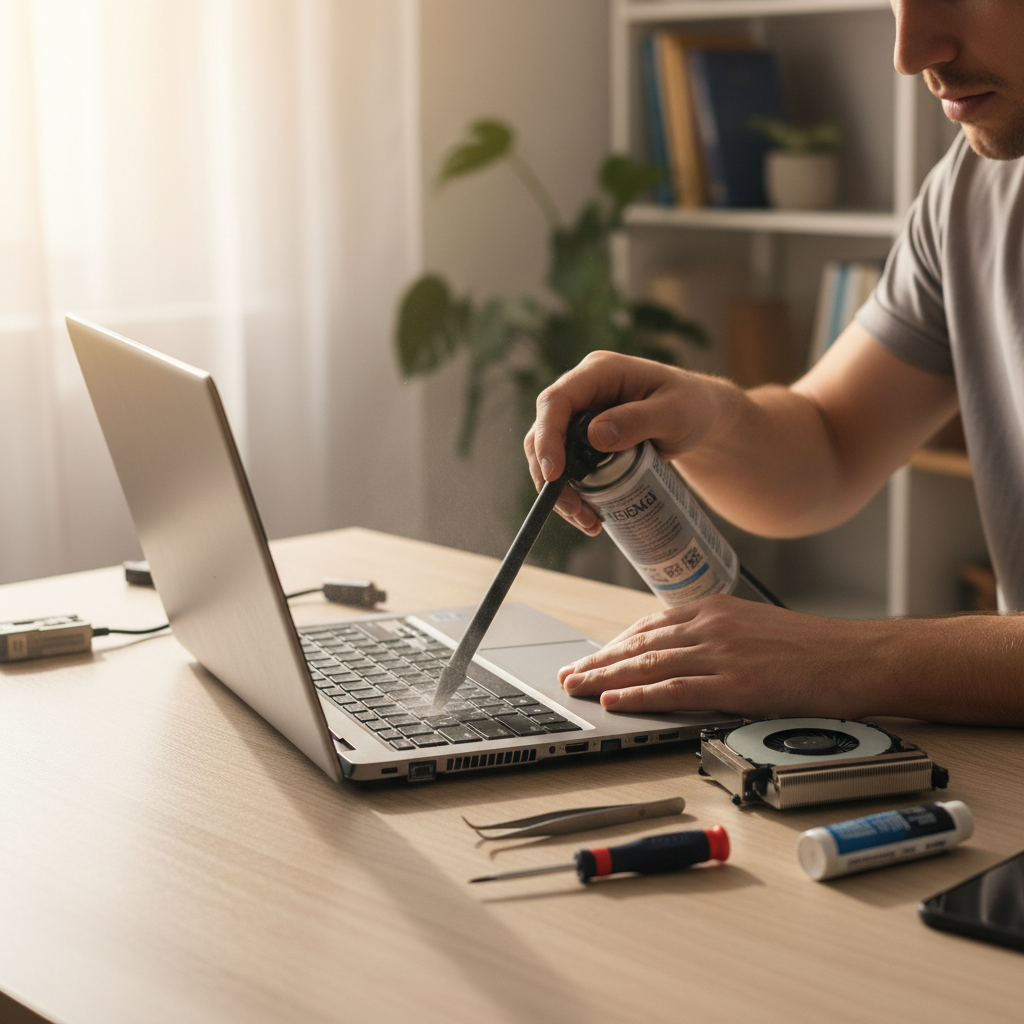
Solution 1: The Dust Buster – Cleaning the Vents
This is the most common fix and often the most effective. Dust buildup is the number one cause of laptop overheating. Here’s how to clean it safely and effectively:
- Power Down and Unplug: Turn off your laptop and unplug the power adapter.
- Gather Your Tools: You’ll need compressed air (essential!), a small brush (like a toothbrush or a soft paintbrush), and possibly a microfiber cloth.
- Locate the Vents: Look for the vents on your laptop. They’re usually on the sides, back, or bottom.
- Use Compressed Air: This is the most important tool. Hold the can upright and direct short bursts of air into the vents. Aim the nozzle at different angles to dislodge dust from all directions. Don’t get too close – you don’t want to damage any internal components.
- Brush and Wipe (Optional): If you can access the vents with a brush, gently brush away any remaining dust. Use the microfiber cloth to wipe the exterior of the vents.
- Repeat and Observe: Repeat the process, blowing air and brushing until you no longer see any dust coming out.
Important Note: Never use a vacuum cleaner on your laptop vents. The static electricity can damage internal components. Also, be careful about blowing air into the vents from the outside. You might inadvertently push the dust further inside.
Solution 2: Software Fixes: Driver Updates and Resource Management
Sometimes, the solution is software-based:
- Update Your Drivers: Outdated or corrupted drivers can cause your CPU and GPU to work harder than necessary. Go to your laptop manufacturer’s website (e.g., Dell, HP, Lenovo) and download the latest drivers for your graphics card, chipset, and other relevant components.
- Manage Startup Programs: Too many programs starting automatically can slow down your system and increase CPU usage. Disable unnecessary startup programs in Task Manager (Windows) or System Preferences (macOS).
- Optimize Power Settings: Make sure your laptop’s power settings are balanced. Go to Control Panel (Windows) or System Preferences (macOS) and choose the “Balanced” power plan. Avoid using “High Performance” unless necessary, as it can make your components run hotter.
Solution 3: The Thermal Paste Gambit
Over time, the thermal paste that sits between your CPU/GPU and the heat sink can dry out, losing its effectiveness. If you’re comfortable with opening your laptop, replacing the thermal paste can significantly improve heat dissipation. However, this is a more advanced fix:
- Research Your Laptop: Before you start, research your laptop model to find instructions on how to safely open it.
- Gather Your Supplies: You’ll need thermal paste (Arctic MX-4 is a popular choice), a small screwdriver, a plastic pry tool (for opening the case), and a microfiber cloth.
- Open the Laptop: Carefully remove the back panel of your laptop.
- Locate the Heat Sink: The heat sink is usually a metal structure that sits on top of the CPU and GPU.
- Remove the Heat Sink: Unscrew the heat sink (usually with small screws). Be very careful, as you don’t want to damage any components.
- Clean the Old Paste: Use the microfiber cloth to carefully clean off the old thermal paste from the CPU/GPU and the heat sink.
- Apply New Paste: Apply a small pea-sized amount of new thermal paste to the center of the CPU/GPU.
- Reassemble and Test: Carefully reassemble the heat sink, making sure it’s properly seated and screwed in. Close up the laptop and test the temperatures with your monitoring software.
Warning: This can void your warranty, and if done incorrectly, could damage your laptop. If you’re not comfortable with this, consider taking your laptop to a qualified technician.
Solution 4: Consider a Cooling Pad (External Help)
If your laptop still overheats after cleaning and other fixes, a cooling pad can help. These pads have fans that blow air onto the bottom of your laptop, improving airflow and helping to dissipate heat. It’s a simple solution, but it can be very effective.
Common Mistakes to Avoid
Many people make these mistakes when trying to fix overheating issues, making things worse:
- Ignoring the Problem: The worst thing you can do is ignore the warning signs. Overheating can lead to permanent damage to your laptop’s components.
- Using a Vacuum Cleaner: As mentioned earlier, this can damage internal components due to static electricity.
- Using the Laptop on Soft Surfaces: Using your laptop on a bed, sofa, or blanket can block the vents and trap heat.
- Overclocking without Proper Cooling: Pushing your components beyond their designed limits generates more heat. Make sure you have adequate cooling if you overclock.
- Assuming a Quick Fix Will Solve Everything: Often, a combination of fixes is needed. Don’t expect cleaning the vents alone to solve a complex issue.
Expected Results and Timeline
Here’s what you can expect:
- Cleaning Vents: You should see an immediate improvement in fan noise and temperature, often within minutes. This should take you 15-30 minutes, tops.
- Driver Updates and Software Optimizations: Within a few hours after updating drivers and optimizing settings, the temperatures should come down.
- Thermal Paste Replacement: After replacing the thermal paste, you might see a 5-10°C drop in temperatures. This is a more complex fix that could take a couple of hours.
- Cooling Pad: If you use a cooling pad, you might see a more immediate reduction in temperature while using your laptop.
Remember, the goal is not just to reduce the temperature but also to prevent the problem from recurring. You want your laptop to last for years to come.
Preventing Future Meltdowns: Long-Term Cooling Strategies
Once you’ve fixed the current overheating issue, you need to implement some strategies to prevent it from happening again. Prevention is much easier than a complete repair:
- Regular Cleaning: Clean the vents of your laptop at least every 6 months, or more frequently if you live in a dusty environment or have pets.
- Proper Placement: Always use your laptop on a hard, flat surface to ensure proper airflow. Avoid using it on soft surfaces.
- Monitor Temperatures: Keep an eye on your CPU and GPU temperatures with a monitoring tool. If you notice a gradual increase in temperature over time, investigate the cause.
- Software Management: Regularly close unused programs and be mindful of resource-intensive applications.
- Upgrade Your Hardware (If Possible): If you’re a heavy user, consider upgrading your laptop’s cooling system or even purchasing a more powerful laptop with a better cooling design if the current one is inadequate.
The best way to ensure the longevity of your laptop is to keep it clean, provide it with good airflow, and monitor its performance. These simple steps will help you avoid the frustration of an overheating machine and keep it running smoothly for years to come.
If you’re looking for ways to generate multiple income streams that can grow over time, check out this article on RelyOwn.
FAQs: Your Burning Questions Answered
Here are some of the most common questions people ask about laptop overheating:
- Why is my laptop fan so loud? A loud fan is usually a sign of overheating. This could be due to dust buildup, excessive CPU/GPU usage, or a failing fan.
- Is it safe to use my laptop on my bed? No, it’s generally not recommended. Soft surfaces can block the vents and trap heat, leading to overheating.
- How often should I clean my laptop’s vents? Aim to clean your vents every 6 months, or more frequently if you live in a dusty environment or have pets.
- What temperature is too hot for a laptop? Ideally, keep your CPU and GPU temperatures below 70°C (158°F) during normal use. Prolonged use above 90°C (194°F) is a cause for concern.
- Can overheating damage my laptop? Yes, prolonged overheating can damage your CPU, GPU, and other components, leading to performance issues or complete failure.
- How can I prevent my laptop from overheating? Clean your vents regularly, use your laptop on a hard surface, monitor temperatures, and manage software and hardware resources.
- Should I replace the thermal paste on my laptop? If you’re comfortable with opening your laptop and have some experience, replacing the thermal paste can improve cooling. If you’re not comfortable, you can always take it to a qualified technician.
- My laptop is overheating even after cleaning the vents. What should I do? If cleaning the vents doesn’t solve the problem, try updating your drivers, managing startup programs, checking your power settings, and if you are comfortable, replacing the thermal paste. If none of these solutions work, consider getting professional assistance.
I hope this comprehensive guide has helped you diagnose, fix, and prevent overheating issues on your laptop. Remember, a cool laptop is a happy laptop – and it’s one that will last you a long, long time.